
I’m gonna be real with you. When I first loaded up Drain the Lake on Roblox, I thought it was just another mindless Roblox clicker. Fill bucket, pour bucket, repeat. How complicated could it be?
Turns out it is pretty complicated when you’re using the wrong bucket.
I spent my first few hours painfully going with that basic Common Bucket, watching my Token count crawl upward slower than a snail on vacation. Meanwhile, I’d see other players zooming past me in the leaderboards, unlocking upgrades I couldn’t even dream of. I figured a bucket was a bucket, they all do the same thing, right?
Wrong. So incredibly wrong.
The bucket you choose in this game isn’t just a cosmetic flex to show off to your friends. It’s literally the difference between progressing at a snail’s pace and actually having fun. Some buckets give you massive Token multipliers. Some give you insane water collection bonuses. Some literally auto-cash out for you so you don’t have to manually drain. And some are just straight-up traps that waste your hard-earned currency.
I’ve tested every single bucket in this game, the good, the bad, and the ones that made me question why I even bothered. Here’s everything I wish someone had told me before I wasted my Gems on buckets that looked cool but delivered absolutely nothing.
The Game Loop That Keeps You Coming Back
Before we get into the buckets, let me explain what you’re actually doing in this game because it took me forever to figure out the strategy.
Your phone fell into a lake. That’s it. That’s the whole premise. You stand near the water, fill your bucket, teleport to the drain, pour it out, and earn Tokens. Repeat that cycle until the water level drops far enough that you can reach the bottom and grab your phone.
Simple, right? But here’s where it gets interesting: the better your bucket, the faster you progress. More Tokens mean faster upgrades, which means faster draining, which means reaching the bottom quicker.
The whole game is about optimizing this stupidly simple loop. And the single most important piece of that optimization? Your bucket choice.
The Tier System I Wish I’d Understood Sooner
I’m ranking these buckets based on one thing only: how much they speed up your progression. Not rarity, not how cool they look, not how much they cost. Pure, raw efficiency.
S-Tier is the cream of the crop. These buckets have exceptional Token bonuses, powerful special effects, or outstanding water collection that makes your farming loop dramatically faster.
A-Tier is excellent. These buckets will comfortably carry you through most content and remain useful throughout the game.
B-Tier is solid. They specialize in certain bonuses but eventually fall behind the best options.
C-Tier is where you start. Limited effects that should be replaced as quickly as possible.
Now let’s get into the actual buckets and my personal experiences with each one.
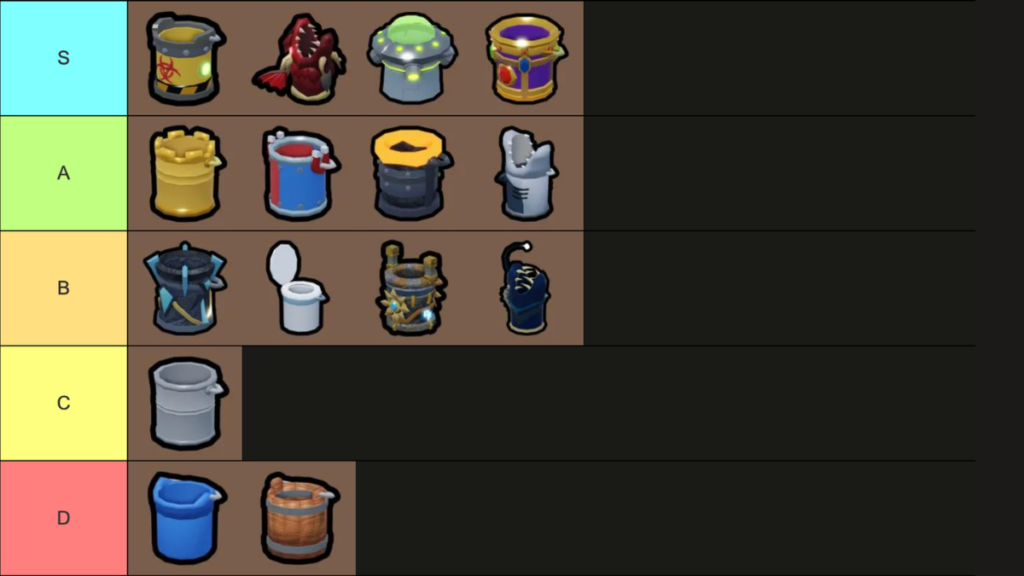
S-Tier: The Buckets You’re Desperately Chasing
Dragon Bucket – The King of Tokens
Rarity: Mythic | Cost: 448 Robux
This is the bucket everyone wants, and honestly? For good reason.
I saved up and bought this thing after weeks of grinding, and the difference was immediate. The Dragon Bucket gives you a permanent +20% Token Earnings and a 15% chance to double your entire payout on any given pour.
Let me tell you about that 15% chance. It doesn’t sound like much on paper, I know. But over hundreds of pours, it compounds into a ridiculous amount of extra Tokens. Every time that double payout triggers, I literally fist-pumped. You feel like you just won the lottery.
The 448 Robux price tag stings, I won’t lie. I stared at that purchase button for a solid five minutes before clicking it. But if you’re planning to play this game long-term, it’s probably the best Robux investment you can make. I’ve gotten so much value out of it.
Who should buy it: Anyone planning to play for more than a week. The Token generation is unmatched.
Toxic Bucket – The F2P King
Rarity: Legendary | Obtained: Bucket Wheel (1% chance)
Here’s the thing that blew my mind: the Toxic Bucket matches the Dragon Bucket’s +20% Token Earnings, but you can get it completely free.
The catch? It’s a 1% drop from the Bucket Wheel. I spun that wheel so many times I lost count. My friends were getting it left and right, and I was just sitting there with my pile of common buckets feeling personally attacked by RNG.
But when it finally hit? Oh man, was it worth the wait.
The 10% chance to instantly cash out when your bucket is full is the secret sauce. Instead of manually teleporting back to the drain every single time, the Toxic Bucket sometimes just… does it for you. It removes downtime between runs and makes farming so much smoother.
For free-to-play players, this is arguably the best bucket in the entire game. If you land it from the wheel, consider yourself blessed. And if you’re still spinning, keep going, it’s worth the grind.
Who should chase it: Every single F2P player. Spin that wheel until you get it.
Alien Bucket – The Efficiency Monster
Rarity: Epic | Obtained: TBA
The Alien Bucket gives you a 10% chance to scoop 3x water and a +10% Token Earnings boost.
What makes this bucket special is how it combines two different types of bonuses. The triple water collection means fewer trips across the lake, which speeds up your loop dramatically. And the +10% Token Earnings ensures each of those trips pays out more.
I didn’t appreciate this bucket until I actually tried it. The 3x water procs feel amazing when they hit. You go from making one trip to effectively making three. It’s one of the fastest farming loops in the game.
Who should use it: Anyone who hates running back and forth across the lake. This bucket minimizes trips and maximizes efficiency.
Jewel Bucket – The Highest Multiplier
Rarity: Epic | Obtained: In-Game Progression
Here’s the thing about the Jewel Bucket: it has the highest Token multiplier in the entire game at +30%.
On top of that, pours can turn up Diamonds, giving you two valuable resources from every single run. It’s an absolute powerhouse for progression speed.
I was skeptical at first, how much difference could 30% really make? Turns out, a lot. Your Token income skyrockets, and the extra Diamonds mean you can afford other buckets faster. It’s a beautiful synergy.
Who should use it: Anyone who’s unlocked it through progression. This thing is a monster and absolutely deserves its S-Tier spot.
A-Tier: The Workhorses That’ll Carry You
Golden Bucket – The Steady Grinder
Rarity: Legendary | Cost: 2,000 Gems
The Golden Bucket gives you +15% Token Earnings and a chance to earn Diamonds from pours. It’s the best direct-purchase option for free players if you haven’t landed the Toxic Bucket yet.
I used this bucket for a solid two weeks while I was saving up for better options, and it never let me down. The Token boost is respectable, and the Diamond income is a nice bonus that helps you afford other Gem-locked buckets.
Who should buy it: F2P players who haven’t gotten Toxic Bucket from the wheel yet. Save up those 2,000 Gems, it’s worth the wait.
Lava Bucket – The Consistent Performer
Rarity: Epic | Cost: Starter Pack
The Lava Bucket combines a +15% Token Earnings baseline with a 10% chance that a pour pays 1.25x Tokens.
It’s easier to access than the Toxic Bucket and more focused on Token income than the Golden Bucket’s Diamond bonus. It’s a solid mid-game option that won’t let you down.
Who should use it: Mid-game players who want consistent Token income without breaking the bank.
Shark Bucket – The Water Collector
Rarity: Mythic | Obtained: TBA (Currently Unavailable)
The Shark Bucket has a 15% chance to scoop 3x Water. That’s it. No Token multiplier, no other bonuses.
So why is it A-Tier? Because cutting down the number of trips needed per drain cycle is incredibly valuable. Every time that 3x proc hits, you’re saving time. And time saved is Tokens earned faster.
The problem is it’s currently unavailable, which is a huge bummer. If it ever comes back, I’ll be grabbing it immediately.
Who should use it: Anyone who wants to minimize travel time. The 3x water chance is genuinely impactful.
Magnet Bucket – The Auto-Collect Godsend
Rarity: Rare | Cost: 1,200 Gems
The Magnet Bucket auto-collects Tokens and gives you +5% Token Earnings.
The Token bonus is modest, but let me tell you about the real value: removing the manual drain step from your loop streamlines everything. You don’t have to teleport back and forth as much. The convenience is genuinely game-changing.
I bought this thing and immediately wondered how I ever played without it. It’s one of those quality-of-life upgrades that you don’t realize you need until you have it.
Who should buy it: Anyone who’s tired of the back-and-forth grind. This bucket makes the loop so much smoother.
B-Tier: The Specialists
Diamond Bucket – The Gem Farmer
Rarity: Legendary | Obtained: TBA
This bucket makes pours produce Diamonds and gives you +25% more Diamonds from pours.
If Gems are your current bottleneck, this is your best friend. The +25% Diamond bonus accelerates your currency for Gem-priced purchases like the Magnet or Golden Bucket.
The catch? Once you have the high-tier buckets secured, this one has limited ongoing value. Token income becomes more useful than extra Diamonds at that stage.
Who should use it: Players who need Gems for other purchases. Don’t main it forever.
Toilet Bucket – The Capacity King
Rarity: Rare | Obtained: Bucket Wheel (4% chance)
The Toilet Bucket gives you +3 Bucket Capacity and a 10% chance to auto-flush and cash out when full.
It’s the strongest capacity bucket in the game. The extra +3 capacity reduces how often you need to drain, and the auto-flush chance adds a nice efficiency boost on top.
Neither effect rivals the Token multipliers of higher-tier options, but the capacity increase is genuinely useful in the mid-game.
Who should use it: Mid-game players who want fewer trips. It’s a solid upgrade over basic buckets.
Ancient Bucket – The Challenge Reward
Rarity: Legendary | Obtained: Complete “Claim Bucket!” Challenge
The Ancient Bucket gives you +10% Token Earnings and higher-tier Gems from dig-ups.
The Token bonus is decent, and the higher-tier Gem drops help accelerate your Gem economy. The best part? It costs no Gems or Robux, you just need to complete the challenge.
Who should use it: Anyone working through the challenge list anyway. Free bucket is free bucket.
Angler Bucket – The Robux Trap
Rarity: Mythic | Cost: 199 Robux
Let me be real with you: this bucket is a disappointment.
It gives you +5% Token Earnings and digs up higher-tier Gems. That’s it. For 199 Robux, you’re getting the lowest Token multiplier of any paid bucket.
If you’re spending Robux, the Dragon Bucket at 448 Robux provides dramatically more progression value. The Angler Bucket sits in B-Tier purely because the Gem quality effect has some usefulness.
Who should buy it: Honestly it is almost nobody. Save your Robux for the Dragon Bucket. I bought this thing and regretted it immediately.
C-Tier: The Traps You Should Replace Immediately
Metal Bucket – The Overpriced Capacity Upgrade
Rarity: Uncommon | Cost: 500 Gems
The Metal Bucket adds +2 Bucket Capacity. That’s it.
The effect is too minor to justify 500 Gems when the Magnet Bucket at 1,200 Gems provides auto-collection plus Token earnings. You’re better off saving your Gems for something better.
I bought this early on thinking it was a good upgrade. I was wrong. Don’t make my mistake.
Who should use it: Nobody. Save your Gems.
Plastic Bucket – The Useless Speed Boost
Rarity: Common | Cost: 200 Gems
The Plastic Bucket gives you +5% Fill Speed. Fill Speed is the least impactful stat in the entire game.
Slightly faster bucket filling does not offset the value of better Token multipliers or auto-collection mechanics. It’s a minimal improvement over the free Common Bucket and should be replaced as soon as possible.
Who should use it: Nobody. Save your Gems.
Common Bucket – The Starter
Rarity: Common | Cost: Free
The Common Bucket provides no passive effect of any kind. Use it only until you can afford any other option. Replace it immediately at the start of every run.
Who should use it: Brand new players who haven’t earned anything else yet.
How To Actually Change Your Bucket
Head to the Buckets vendor on the left side of the starting area. Talk to the NPC, browse all available buckets, purchase any you can afford, and equip whichever one you want to use for that run.
You can also get some exclusive Buckets from the Spin Wheel, they’re rolled separately from the vendor. Spin the wheel for a chance at Rare and Legendary options like the Toilet and Toxic Buckets without spending Gems directly.
What I Wish I’d Known From The Start
Don’t waste Gems on C-Tier buckets. I bought the Metal Bucket early on thinking it was a good upgrade, and I regretted it immediately. Save for the Magnet Bucket or Golden Bucket instead.
The Bucket Wheel is worth spinning if you’re F2P. The Toxic Bucket is a 1% drop, but it’s arguably the best bucket in the game for free players. Every spin is a chance at something amazing.
Rarity doesn’t determine usefulness. The Angler Bucket is Mythic rarity but it’s B-Tier at best. Meanwhile, the Jewel Bucket is Epic and sits comfortably in S-Tier.
The Jewel Bucket has the highest Token multiplier. If you can unlock it through progression, do it. That +30% Token Earnings is no joke.
Final Thoughts From Someone Who’s Been There
Look, I spent way too long using the wrong buckets and watching my progression crawl. The moment I actually paid attention to what each bucket did and planned my purchases accordingly, everything changed.
The Dragon Bucket is king if you’re willing to spend Robux. The Toxic Bucket is the best F2P option if you can land it from the wheel. The Jewel Bucket has the highest multiplier if you can unlock it.
But honestly the “best” bucket depends on where you are in the game. Early on, any upgrade is better than the Common Bucket. Mid-game, the Magnet and Golden Buckets will carry you. Late game, you want the S-Tier options.
Just don’t buy the Angler Bucket. Seriously. Learn from my mistakes. I spent 199 Robux on that thing and used it for maybe two days before switching back to the Toxic Bucket.
FAQ
Q: Is the Dragon Bucket worth buying?
A: Yes, if you plan to play long-term. The +20% Token Earnings plus 15% chance to double your payout is unmatched. The 448 Robux cost is the main barrier, but no free bucket reaches the same Token income.
Q: What’s the best bucket for F2P players?
A: The Toxic Bucket is the best F2P option, but it’s a 1% drop from the Bucket Wheel. If you haven’t landed it yet, the Golden Bucket at 2,000 Gems is the best direct-purchase option.
Q: Why is the Angler Bucket ranked so low?
A: It costs 199 Robux and provides only +5% Token Earnings alongside a Gem quality bonus. That’s a significantly weaker return than alternatives like the Toxic Bucket. I bought it and regretted it.
Q: How do I get the Toxic Bucket?
A: It’s a 1% drop from the Bucket Wheel. You’ll need to spin the wheel and hope you get lucky. There’s no direct purchase option.
Q: What’s the best bucket for earning Gems?
A: The Jewel Bucket generates Diamonds while giving you the highest Token multiplier. The Diamond Bucket also specializes in Gem income.
Q: Should I buy the Metal or Plastic Bucket?
A: No. Save your Gems for better options like the Magnet Bucket or Golden Bucket. I learned this one the hard way.
Q: How do I change my bucket?
A: Talk to the Buckets vendor on the left side of the starting area. Browse, purchase, and equip from there.
Q: Is the Shark Bucket worth using?
A: It’s excellent for water collection with a 15% chance to scoop 3x Water. But it’s currently unavailable, and it provides no Token multiplier, which keeps it out of S-Tier.
Discover the latest game tier lists, rankings, meta updates, and character guides to stay ahead of the competition.
Browse all Latest Tier List →
