
When I first started playing Catch a Brainrot on Roblox, I had absolutely no idea what I was doing. I was just running around, catching whatever looked cool, and throwing moves together like I was assembling a randomized pile of garbage. And honestly speaking, I got absolutely destroyed. In PVP, in PVE, it didn’t matter. I was losing to everyone.
But here’s the thing about this game that took me way too long to figure out: it’s not actually about which Brainrot you catch. I know, I know, that sounds crazy. Every other monster-catching game is all about the rarity and the specific creature. But Catch a Brainrot flips that on its head.
The only thing that actually matters is the moves your Brainrot has and the energy economy of your setup.
I’ve spent some hours testing every move combination, and even dying in PVP matches I should have won, and slowly piecing together what actually works. Let me save you the pain I went through.
The Big Misconception That Kept Me Losing
Here’s what I didn’t understand at first: Brainrot rarity matters, but not for the reason you think. Sure, higher rarity Brainrots like Insane or Exclusive have better stat potential and a higher chance of rolling good moves. But your actual strategy revolves entirely around the moves themselves.
I spent my first week desperately trying to catch exclusive Brainrots, thinking that was the key to winning. Meanwhile, some guy with a team of common Brainrots was destroying me because he actually understood the energy economy.
The moment I realized this, everything clicked.
You want to farm Brainrots in the highest-level area you can because the moves they drop scale with the area level. Your endgame goal is having at least four Level 60+ Brainrots with good move rolls. Rarity helps, but it’s not the end-all-be-all.
The Energy Economy That Took Me Forever To Understand
Okay, so here’s the actual secret sauce of this game. Every move costs a certain amount of energy. You start each turn with one energy, and you gain energy by defeating enemies. The whole game revolves around managing this energy efficiently.
What I learned the hard way: mixing different energy costs in your moveset is way more important than having all the highest damage moves.
If you run three moves that all cost the same amount of energy, you’re setting yourself up for failure. Your energy economy gets all messed up and you’re stuck either wasting energy or waiting around for it to build up.
The backbone of any good setup is at least one 2-Cost damage move. I cannot stress this enough. You need cheap moves to fill gaps in your energy economy and keep consistent damage pressure. I used to run only expensive moves thinking big damage = big wins. Spoiler: it doesn’t work that way.
The Holy Grail Moves You’re Desperately Chasing
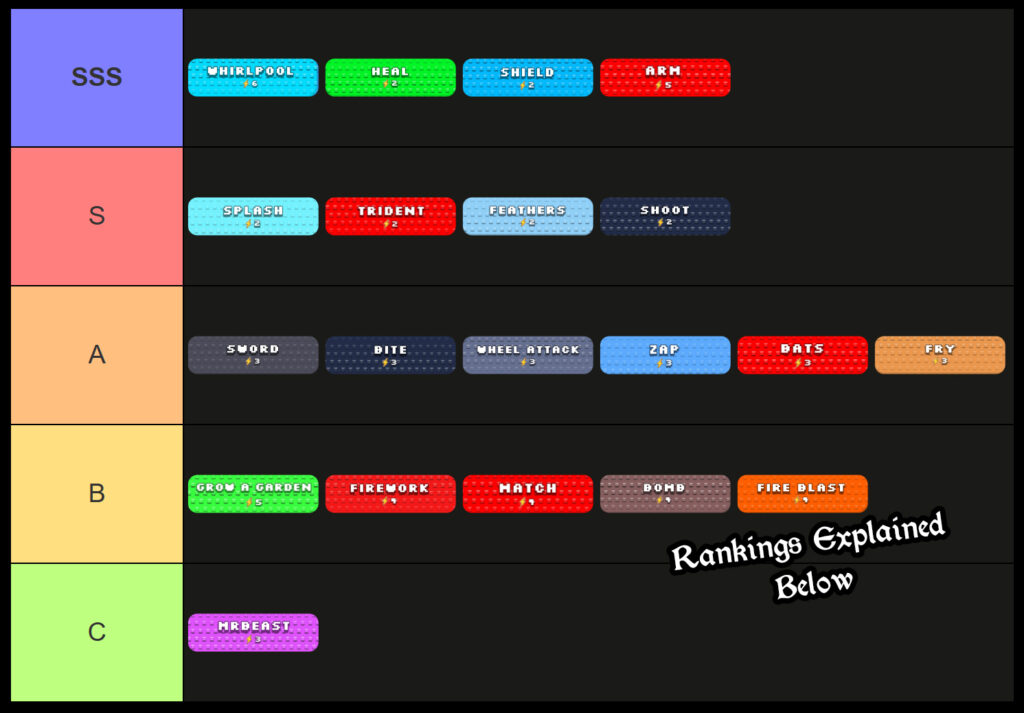
Whirlpool – The Absolute Nuke
This is the move everyone’s farming for, and for good reason. Whirlpool has the highest damage in the game and absolutely melts bosses and Brainrot farming encounters.
The trick with Whirlpool is understanding how to use it. You don’t just sit there charging it up for multiple turns. The damage-per-energy has diminishing returns after 2-Cost moves, so you’re wasting potential if you just charge endlessly.
The real power move is using Whirlpool when you’ve just defeated an enemy and stolen their energy. You get a massive burst of damage that can one-shot the next enemy. It’s incredibly satisfying to pull off.
If you’re going to charge Whirlpool, the only time it’s worth it is if you have four energy from defeating a Brainrot, you charge once for one energy and get your start-of-turn energy, then unleash Whirlpool. That’s the sweet spot.
Arm – The Budget Whirlpool
Arm is essentially Whirlpool’s cheaper cousin. It does great damage for a 5-Cost and can be really effective after taking down an enemy and grabbing their energy.
Same rule applies as Whirlpool though, don’t charge it for more than one turn. The damage efficiency just isn’t there if you’re sitting there building up energy.
I used Arm for a while before I finally pulled Whirlpool, and honestly, it carried me through a lot of content. It’s not quite as good for burst damage and energy breakpoints in PVP, but it’s a solid backup if you can’t get the big one.
The Survival Moves That Win Fights
Shield – The Predictor’s Dream
Listen, Shield is absolutely cracked in PVP. It’s also solid in PVE against bosses. The key is using it when you know a big move is coming.
If you see a boss has four or more energy, they’re probably about to drop something nasty on you. That’s when you throw up Shield. It always makes you go first and lasts for one turn, completely negating whatever damage was coming your way.
I can’t tell you how many PVP matches I’ve won just by predicting when my opponent was about to use their big attack and shielding at the right moment. It’s the kind of move that separates decent players from actually good ones.
Heal – The Underrated Sustainer
Heal is another 2-Cost move that’s way better than people give it credit for. The secret combo I discovered: Heal followed by a 2-Cost damage move. Both the heal and the damage from that move will be more effective than trying to use Grow a Garden.
Heal keeps your Brainrot in the fight against tough bosses and in PVP matches where you’re trading blows. It’s simple but effective. Just make sure you have an Insane rarity or higher Brainrot if you want the boosted healing numbers.
The 2-Cost Damage Moves You Need
Shoot, Trident, Feathers, and Splash are all 2-Cost damage moves that are absolute gold. They’re the best economy moves in the game. You can spam them, fire them off with leftover energy, and they fit into basically any setup.
I’ve run 2-3-4 setups, 2-2-5 setups, 2-2-6 setups, and 2-3-6 setups. Every single one of them had at least one 2-Cost damage move as the backbone. You should always have one of these in your moveset. Always.
The 3-Cost Moves That Bridge The Gap
Sword, Bite, Wheel Attack, Zap, Bats, and Fry are your 3-Cost options. They’re solid moves that fit into slightly fewer moveset loadouts than the 2-Cost options, but they’re still incredibly useful.
The thing I love about 3-Cost moves is they’re much easier to fit into your energy economy than 4-Cost or 5-Cost moves. You’re not struggling to find the energy to use them, and they provide good damage for their cost.
One important note: MrBeast is a trap. It deals less damage than other 3-Cost moves like Sword. I wasted way too much time trying to make MrBeast work before I realized it was just mathematically worse.
The 4-Cost Moves That Fall Off
Fireworks, Match, Bomb, and Fire Blast are your 4-Cost options. They’re fantastic early game and can still work in 2-3-4 setups in the mid-to-late game.
But here’s the thing: once you start getting 5-Cost and 6-Cost moves, 4-Cost moves become B-Tier. They’re build-specific and situational. You’re usually better off having a 5 or 6-Cost move for more burst damage in the late game.
I used to run 4-Cost moves exclusively because they were all I had. Then I got my first 6-Cost and suddenly understood what I’d been missing. The damage difference is substantial.
The Move You Should Avoid
Grow a Garden – The Trap
I genuinely don’t understand why anyone would use Grow a Garden in the late game. It’s a 5-Cost move with low damage and low healing. The efficiency is just terrible.
If Grow a Garden was a 4-Cost, it might be decent. If the damage and healing were pumped up, it could be worthwhile. But as things currently stand, you’re way better off firing off an Arm or Whirlpool, or using a 2-Cost damage move and a Heal together.
I used Grow a Garden for like two days before I realized how badly I was griefing myself. Don’t make the same mistake I did.
The Best Moveset Setups That Actually Work
Defensive PVP Setup
This is the setup that carried me through so many PVP matches when I was still learning. You want: 2-Cost Shield or Heal, then 2-Cost DPS, then 3-Cost or 4-Cost DPS.
Shield is the absolute best for PVP. The prediction aspect makes it so powerful. Heal is also good, but you need an Insane rarity Brainrot or higher for boosted numbers.
The combo is simple: survive their big attacks, heal up, and wear them down with consistent damage. It’s not flashy, but it works.
Offensive PVP Setup
This is for when you want to be aggressive. You want: 2-Cost DPS, 3-Cost DPS, and 6-Cost DPS with Whirlpool.
The key here is good energy management. You’re trading damage aggressively and using Whirlpool when you steal energy on-kill. It’s high-risk, high-reward, and incredibly satisfying when it works.
PVE Setup
For farming and boss fights, you’ve got options. 234 with all DPS is solid. 236 with Whirlpool works great. Or 22X where one 2-Cost is DPS, one is Heal, and X is a 4-Cost, 5-Cost, or 6-Cost DPS move.
I personally run the 22X setup for most content. Having that heal sustain makes long farming sessions so much more manageable.
What I Learned The Hard Way
Energy variety matters more than you think. I used to run setups with all 4-Cost moves thinking I was being efficient. I was wrong.
Higher rarity Brainrots absolutely help. The stat potential and higher chance of rolling good moves make a real difference. But don’t obsess over getting exclusive Brainrots. Insane rarity can carry you just fine.
Elemental interactions aren’t working right now. The Ice trait on some Brainrots doesn’t actually do anything. So don’t stress about matching elements or whatever. Just focus on getting the right moves.
Final Thoughts From Someone Who’s Been There
I spent way too long playing this game wrong. I chased the wrong things, ran the wrong setups, and lost matches I should have won. But eventually I figured it out.
The game is about energy economy and move synergy. It’s about knowing when to shield, when to heal, and when to unleash your big damage moves. It’s about having a balanced setup that doesn’t waste energy.
If you take anything away from this, take this: always have a 2-Cost damage move in your setup. Always. It’s the backbone of every good moveset.
And don’t use Grow a Garden. Just don’t.
FAQ
Q: Does Brainrot rarity actually matter?
A: Yes, but not as much as you think. Higher rarity means better stat potential and higher chance of rolling good moves. But a well-built common Brainrot can beat a poorly-built exclusive one.
Q: What’s the best move in the game?
A: Whirlpool. It has the highest damage for bursting bosses and farming. The energy economy takes some getting used to, but it’s absolutely worth it.
Q: Why should I always have a 2-Cost move?
A: 2-Cost moves are the backbone of your energy economy. They fill gaps in your energy and let you maintain consistent damage pressure. Every good setup has at least one.
Q: Is Shield or Heal better?
A: Shield is better for PVP because of the prediction aspect. Heal is great in both modes but really shines with high rarity Brainrots for boosted numbers.
Q: What’s the worst move in the game?
A: Grow a Garden. It’s a 5-Cost with low damage and low healing. You’re better off using a 2-Cost damage move and Heal together for better efficiency.
Q: Is MrBeast actually bad?
A: Yes. It deals less damage than other 3-Cost moves like Sword. There’s really no reason to use it if you have access to better options.
Q: Should I use 4-Cost moves?
A: They’re great early game and can work in 2-3-4 setups. But once you have 5-Cost and 6-Cost moves, 4-Cost moves become build-specific and situational.
Q: What’s the best PVE setup?
A: 22X works well. One 2-Cost DPS, one 2-Cost Heal, and X being a 4, 5, or 6 DPS move depending on what you have. The sustain makes farming way easier.
Discover the latest game tier lists, rankings, meta updates, and character guides to stay ahead of the competition.
Browse all Latest Tier List →
